Real Cedar Logo
cladding
Back
real cedar cladding
introduction
Back
cladding home
cladding gallery
why real cedar?
western red cedar characteristics
sustainability
biophilia
design & spec
Back
cladding grades
engineered cedar
cladding calculator
building
Back
preparation for installation
pre-building tips
dupont™ tyvek® drainwrap™
installation
general installation
installing profiles
finishing
Back
how to finish
types of finishes
care & maintenance
restoration
cladding profiles and trim
Back
t&g cladding
trim boards
bevel cladding
board and batten cladding
shiplap or channel cladding
shingle panels
western red cedar soffits
decking
Back
real cedar decking
introduction
Back
decking home
decking gallery
why real cedar?
western red cedar characteristics
sustainability
biophilia
engineered cedar
planning
Back
decking calculator
building
Back
fastener recommendations
stair & railing installation
finishing
Back
finishing tips
restoration
care & maintenance
deck projects
Back
roof deck
raised deck
ground level deck
uphill sloping lot deck
outdoor
Back
real cedar outdoor
introduction
Back
outdoor home
outdoor gallery
why real cedar?
western red cedar characteristics
sustainability
biophilia
engineered cedar
design & spec
Back
real cedar free diy project plans
design tips
building
Back
project preparation
outdoor fasteners
fence construction
fence specifications
prebuilt fence panels
finishing
Back
finishing techniques
finishing tips
restoration tips
project care & maintenance
fencing
Back
fencing home
fence construction
fence specifications
prebuilt fence panels
indoor
Back
real cedar indoor
introduction
Back
indoor home
indoor gallery
why real cedar?
western red cedar characteristics
sustainability
biophilia
engineered cedar
building products
Back
building preparation
design tips
finishing
Back
finishing tips
care & maintenance
indoor projects
Back
indoor t&g paneling
cedar saunas
doors & windows
blinds & shutters
timbers
Back
real cedar timbers
introduction
Back
timbers home
timbers gallery
why real cedar?
western red cedar characteristics
sustainability
biophilia
engineered cedar
planning
Back
grades and specifications
building
Back
preparation
installation
maintenance
Back
finishing
restoring western red cedar timbers
care & maintenance
resources
Back
real cedar resources
case studies
gallery
cedar books
Installing Tongue & Groove Cladding
Important Information
Please note that the measurements displayed on this webpage are displayed in Imperial units. If metric is required, please perform the proper conversion as necessary.
Please note that the standards, grades and other information mentioned on this webpage are based on North American data. Please refer to your local resources or authorities for country-specific data relating to a particular country if required.

How do I install Western Red Cedar Tongue & Groove cladding?

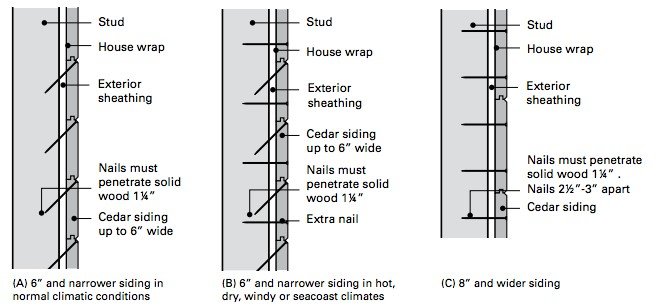
Tongue and groove cladding can be installed horizontally or vertically. In horizontal application, start at the bottom and work up with the groove edges facing downwards. Cladding up to 6 inches wide can be blind nailed with one cladding nail per bearing toe-nailed through the base of each tongue. Wider cladding should be face nailed using two nails per piece. Nails must penetrate 1-1/4 inches into solid wood.

In vertical application, start at one corner with grooved edge toward the adjacent wall. Use a level or plumb line to ensure that the first board is installed plumb. The grooved edge of the first board may have to be trimmed to ensure a flush fit. Cladding is nailed to horizontal blocking lines installed between studs or to furring strips. As with horizontal installation, pieces up to 6 inches can be blind nailed and wider pieces should be face nailed.

© 2026 All rights reserved
Gatsby Website Development by Jambaree

Image Gallery